Announcements to your system
When a declaration that concerns your country is filed, crosses a border or is discharged, ITS can tell your system within seconds. This is optional: without it, your system can still ask ITS for updates. The section Announcements to your system is where you say where ITS should send those announcements.
It has two parts:
- Your receiving endpoint: the address of your service. ITS sends announcements to it over HTTPS, and also calls it for the guarantee check.
- Network settings (advanced): the addresses your system calls ITS from.
What your system must do when an announcement arrives is in Receiving announcements.
Before you start
- You need Organisation admin or Partner in your own organisation. See What each role can do.
- The section appears only on the Live side of your workspace, so the Secretariat must have approved your Live access. On the Sandbox side there is no endpoint or source address to set.
- A new endpoint waits for the Secretariat. Nothing you send here changes where announcements go until it is approved.
- A REC declares an endpoint once per member State it files for, and chooses the Member State in the form.
How to open it
-
Open System integration.
-
Check that Environment is on Live.
-
Scroll to Announcements to your system, under the card saying that your organisation is live.
Declare a receiving endpoint
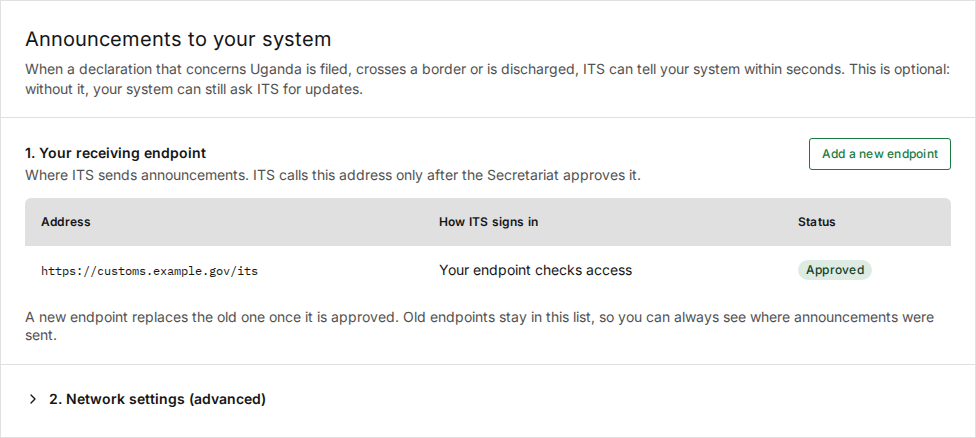
The receiving endpoint is the address of your service: "Where ITS sends announcements. ITS calls this address only after the Secretariat approves it."
-
Under 1. Your receiving endpoint, select Add a new endpoint.
-
A REC only: choose the Member State this endpoint receives for.
-
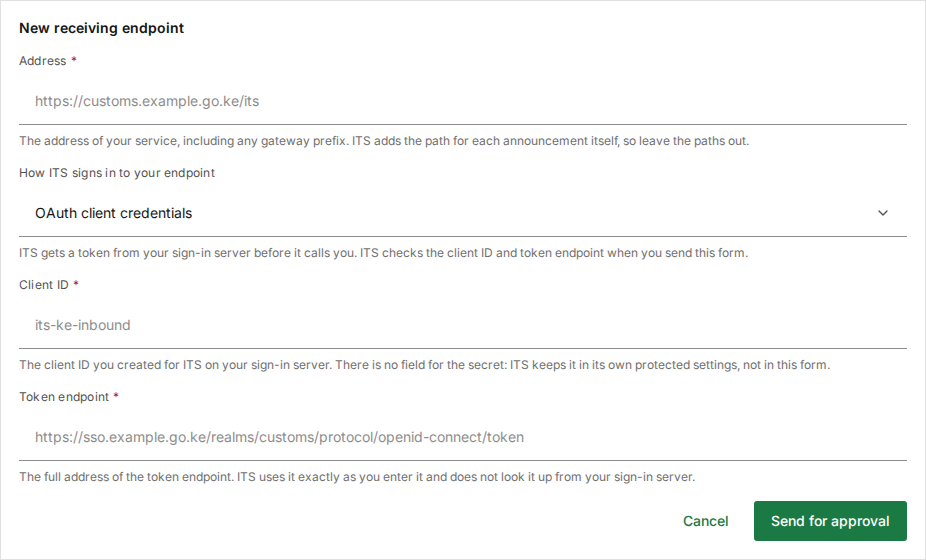
Type the Address of your service. It must start with
https://: any other address is marked under the field, The address must start with https://. ITS sends announcements over HTTPS only., and the form is not sent. -
Choose How ITS signs in to your endpoint.
-
For OAuth client credentials, type the Client ID and the Token endpoint.
-
Select Send for approval, or Cancel to close the form and send nothing.
The form closes and the endpoint appears in the Receiving endpoints table with the status Awaiting approval. There is no other confirmation message. ITS starts calling the address when the Secretariat approves it.
The fields
| Field | Required | What to enter |
|---|---|---|
| Member State | Yes, for a REC. A State Party does not see it | "One endpoint per member you file for. Declare each one separately." |
| Address | Yes | "The address of your service, including any gateway prefix. ITS adds the path for each announcement itself, so leave the paths out." |
| How ITS signs in to your endpoint | Preset | OAuth client credentials: "ITS gets a token from your sign-in server before it calls you. ITS checks the client ID and token endpoint when you send this form." Or My endpoint checks access itself: "ITS calls your endpoint without a token. Your endpoint decides which calls to accept." |
| Client ID | Yes, with OAuth | "The client ID you created for ITS on your sign-in server. There is no field for the secret: ITS keeps it in its own protected settings, not in this form." |
| Token endpoint | Yes, with OAuth | "The full address of the token endpoint. ITS uses it exactly as you enter it and does not look it up from your sign-in server." |
If ITS refuses the form, its message appears in red above the buttons and the form stays open with what you typed. A REC that has no member State to choose reads instead: "No arrangement on file lets this union receive announcements for a member State yet. The Secretariat records the delegation before an endpoint can be declared."
The Receiving endpoints table
| Column | What it shows |
|---|---|
| Address | The address you declared |
| How ITS signs in | OAuth client credentials and the client ID, or Your endpoint checks access |
| Status | See below |
| Status | Colour | Meaning |
|---|---|---|
| Awaiting approval | Amber | Declared. ITS does not call it yet |
| Approved | Green | The address ITS calls |
| Superseded | Grey | Replaced by a later endpoint of your own. Final |
| Displaced | Grey | Stood down because another organisation receives for the country for now, for example a REC filing for a member State. The Secretariat can switch back to it |
Things to know before you rely on the table:
- You cannot edit or delete an endpoint. To change the address, declare a new endpoint. "A new endpoint replaces the old one once it is approved. Old endpoints stay in this list, so you can always see where announcements were sent."
- Your current endpoint keeps receiving until the new one is approved.
- The Secretariat can approve an endpoint but cannot reject one. An endpoint that will not be approved simply stays Awaiting approval. If you declared one by mistake, declare the right one and tell the Secretariat which to approve.
- An empty table reads No endpoints: "You have not added a receiving endpoint yet."
Record your source addresses
Source addresses are the public IP addresses your system calls ITS from. Recording them is optional: "Add them if your network team needs them recorded."
-
Select 2. Network settings (advanced) to open it.
-
Select Add an address.

-
Type the IP address or CIDR, in CIDR notation, for example
196.201.214.0/24. -
Optionally, type a Note, for example "Primary data centre".
-
Select Declare address. If you select Cancel after typing something, the portal asks Discard your changes? first.
The address is listed at once in the Source addresses table, under Network and Note. It needs no approval. An empty table reads "No addresses added yet."
An address cannot be edited or removed on this screen. If one is wrong, ask the Secretariat how to have it corrected.
Related pages
- Your workspace
- Receiving announcements: what your service must accept and answer.
- Approve receiving endpoints: the Secretariat's side of the same request.
- Statuses and colours: the delivery states shown on a declaration.